 | The new email message page is commonly used to craft all aspects of your email message, from layout & design to more technical email tasks. The page is virtually identical when creating a new message and editing an existing one.
|
Using the Email Editor
| Tip | ||
|---|---|---|
| ||
MailUp 8.2 introduces new features of the Email Editor: see what's new |
The built-in editor allows you to:
...
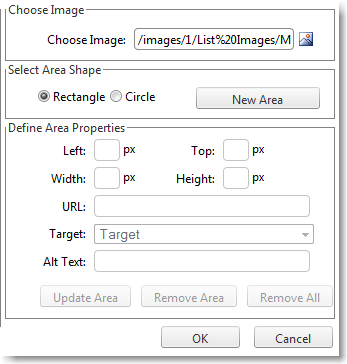
Image Manager | Image Properties |
The Image Manager allows you to upload images, which are saved locally in the system. Once an image is uploaded it will show up on the Browse Files tab. To insert the image into your email, select the image and click on Insert. | Once an image is placed in your email, right-click on the image and click on Image Properties. This tool is very useful to configure the image settings, such as adding an Image Alt text (i.e. the text shown when an image is not shown), including a description, and constraining the image to its original width-height ratio, so that once you resize the image the proportions are not distorted. |
|   |

| Tip | ||
|---|---|---|
| ||
Instead of locally saving your images into the system, you can choose to insert images from the web. This can be done by going into the HTML code and inserting an image tag. Here's a basic example: <img src="insert URL of image" alt="insert text which will be shown if image is blocked"> |
...
To personalize your email message insert dynamic fields. Dynamic fields retrieve any information (personal info, preferences, e-commerce data) stored on your list. For example, if your recipient list contains the first names of your recipients you can insert the [First Name] dynamic field as "Dear [First Name]" in the salutation of the email and each recipient will view their first name in the email, such as "Dear John".
To edit the default value of the dynamic tagsfields, click on Dyn. fields.
|   |
| Tip | ||
|---|---|---|
| ||
To add, edit, and view the recipient data fields go to Settings > Account Settings > Recipient fields. In addition to a set of default fields, including e-commerce specific fields, you can add your own custom recipient data fields. |
Profile Updates
| Anchor | ||||
|---|---|---|---|---|
|
To build and update recipient's information within your List, you can use the Profile Updates feature. This feature allows you to create a custom form that your recipients can fill out and update or add their info to your List.
...
Within the Email editor, click on the blue subscribe button or the red unsubscribe button Insert > Unsubscribe link (view screenshot) to include the corresponding link to any highlighted text or image in your email.

| Tip | ||
|---|---|---|
| ||
The unsubscribe link adds a <a href="http://%5Bunsubscribe%5D/"></a> to the highlighted text (or image) in your email. |
Advanced Settings
...