Quest'area della sezione Proprietà si divide a sua volta in
...
sei sottosezioni che ti permettono di personalizzare
...
Categoria
la tua lista. Se invece vuoi cancellare una lista o crearne di nuove, vai nel menu Configurazioni > Gestione piattaforma > Gestione liste oppure in Configurazioni > Opzioni avanzate > Gestione permessi per definire quali liste mostrare ad ogni utente amministratore.
| Table of Contents |
|---|
| Anchor | ||||
|---|---|---|---|---|
|
| Excerpt |
|---|
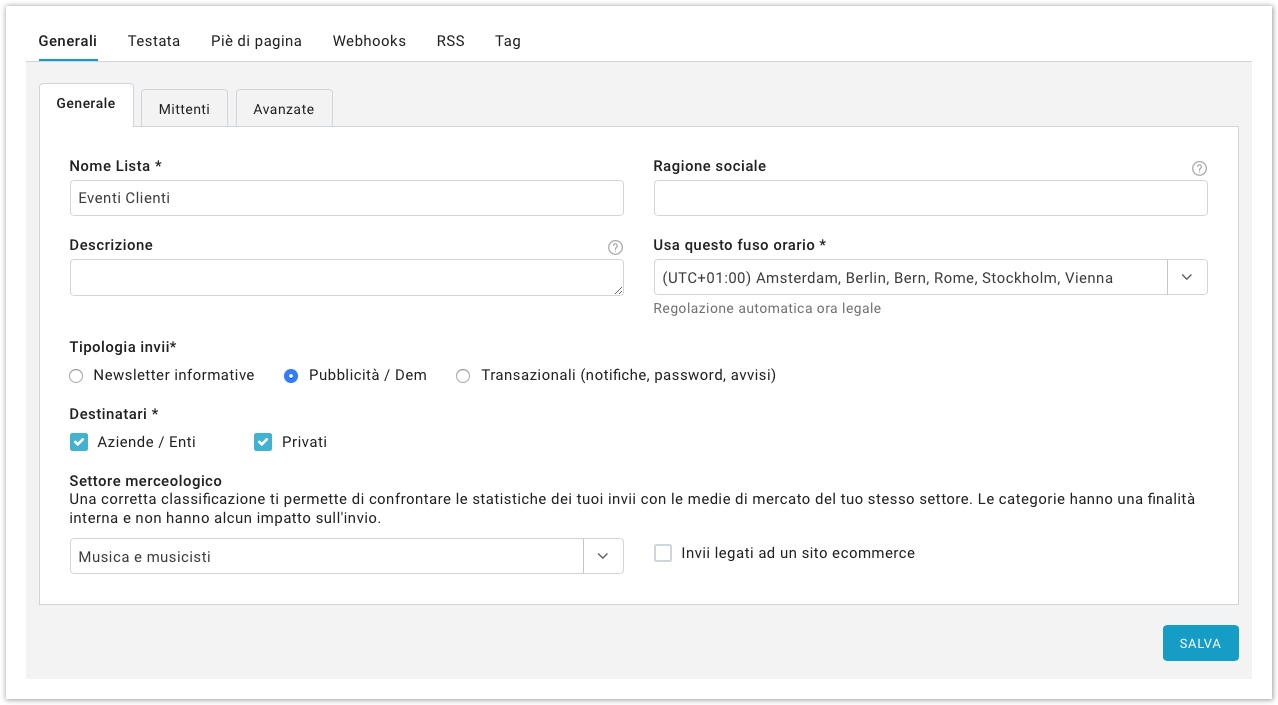
Generale
Qui sono presenti alcune impostazioni di carattere generale.
Inoltre MailUp ti dà la possibilità di confrontare i tuoi invii con quelli di altre aziende del tuo stesso settore merceologico che usano la nostra piattaforma. Per far sì che questo avvenga, |
...
devi compilare correttamente i campi seguenti:
|
...
Di seguito i parametri che puoi modificare in relazione ai dati del mittente:
|
...
|
Iscrizione
In questa pagina puoi abilitare/disabilitare alcuni messaggi automatici che il sistema può inviare:
- Email di benvenuto: il sistema invia una email a ciascun destinatario che conferma la sua iscrizione. Il link Modifica ti porta alla pagina della console Messaggi automatici > Email di benvenuto, in cui puoi modificare il messaggio utiizzando l'editor integrato;
- SMS di benvenuto: il sistema invia un SMS a ciascun destinatario che conferma la sua iscrizione. Il link Modifica ti porta alla pagina della console Messaggi automatici > SMS di benvenuto, in cui puoi modificare il mittente e il contenuto del messaggio;
- Email di richiesta conferma: un messaggio inviato ai nuovi iscritti per far sì che confermino la loro volontà di iscrizione.
Unsubscription
You can choose among several methods of unsubscription - let's see them in detail:
- One-click unsubscribe: Recipients wishing to unsubscribe will be unsubscribed immediately when they click on the unsubscribe link in your messages.
- Make sure your messages contain an unsubscribe link. The best way to go is to include one in the footer that is used for every message sent (Settings > List settings > Preferences > Footer).
- Make sure that the link is clearly marked as the unsubscribe link as customers that click on it will be instantly unsubscribed. There is no additional step for the customer to take (the customer will not need to confirm the intention to unsubscribe).
- Confirmed unsubscribe with options: Recipients wishing to unsubscribe will be presented with a page where they can change their preferences, rather than unsubscribe. For example, they may choose to receive those messages, but with a personal vs. a work email address, or indicate that they wish to receive fewer messages.
Make sure your messages contain an unsubscribe link. The best way to go is to include one in the footer that is used for every message sent (Settings > List settings > Preferences > Footer). - Confirmed unsubscribe with list preferences: Recipients will be presented with a page where they will view all the lists they are currently subscribed to, with the chance to choose to unsubscribe from just some of them. Make sure your messages contain an unsubscribe link. The best way to go is to include one in the footer that is used for every message sent (Settings > List settings > Preferences > Footer).
- Confirmed unsubscribe: Recipients wishing to unsubscribe will be presented with a page where they can confirm their preference. This not only allows you to confirm that they didn't click on a wrong link in the message, but also to show them some custom text.
- Make sure your messages contain an unsubscribe link. The best way to go is to include one in the footer that is used for every message sent (Settings > List settings > Preferences > Footer).
- To configure the page that will be shown when they click on the unsubscribe link, click on the "Update" button far to the right of the screen. Make sure that the page includes a sentence that allows them to complete the unsubscribe process. For example: "To confirm your intention to unsubscribe, please click here".
- Highlight the word(s) that you want to turn into the unsubscribe link and click on the UNS button in the HTML editor toolbar (in the case of the message above, you would highlight the words "click here").
- When customers click on that link, they will be unsubscribed.
At the bottom of this menu you will find the button to enable the "Unsubscribe notification message": this feature sends an email message to the email address indicated, each time a recipient unsubscribes. Just enable the feature, enter a valid email address in the blank and click on"Save".
Advanced options
This area of your admin console is divided into three kind of advanced options:
General Options
- Enable hosted subscription forms: allows you to use the ready-made, customizable subscription forms.
- Display as: set here the name that will be displayed in the "To" section of the email message heading. You can choose uo to 3 personal data fields from the dropdown columns.
- Table headings when listing recipients:
Email Options
...
- The list of messages that are available in the web library can be edited from the menu Messages > Saved. Email messages listed there are published in the web library by default. To archive them, thus removing them from the web library, check the box left of the messages and click on "Archive" at the bottom of the page.
...
- MailUp blog: Google Analytics campaign tracking in MailUp
- How can I track whether an email campaign triggered sign-ups, purchases, page visits, or other activity that follows a click on a link?
- Tracking campaign results with Google Analytics (or any other Web analytics application)
- Tracking code (ConversionLab): MailUp includes a special integration with Trackset's ConversionLab Web analytics system. You can create ConversionLab campaigns directly from within your MailUp admin console. The tracking code for the integration with ConversionLab can be obtained from the ConversionLab "Configure" menu
...
- Multipart option: creates a text-only version of the message that will be viewed by recipients whose systems do not support HTML or use the text-only version by default. Check the box to enable the option.
...
Per maggiori informazioni sulla validazione del mittente email, clicca qui.
Piè di pagina delle emailIn conformità al Can-Spam Act in vigore negli USA e alle principali leggi internazionali anti-spam, MailUp chiede ai propri clienti di inserire le informazioni sul mittente in ogni messaggio inviato. Le informazioni inserite in questa sezione vengono aggiunte automaticamente nei piè di pagina delle email spedite.
* campi obbligatori
Impostazioni piattaforma
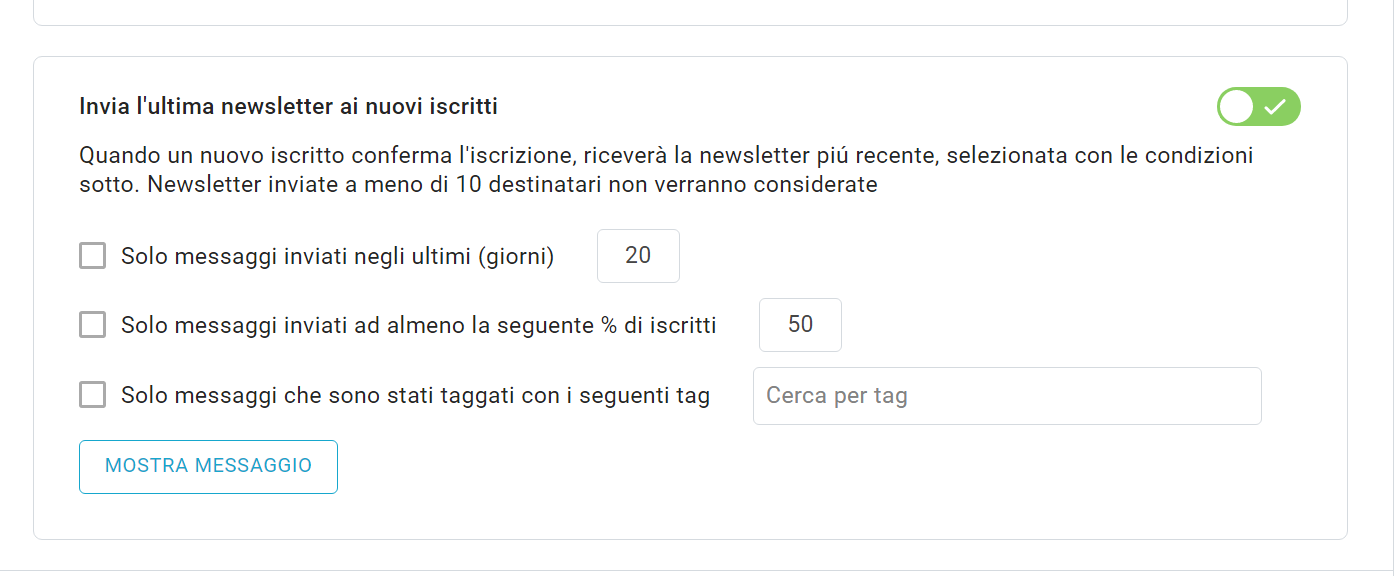
Invia l'ultima newsletter ai nuovi iscrittiCon questa impostazione, al termine dell’iscrizione ogni nuovo destinatario riceverà in automatico il tuo ultimo messaggio. Ci sono due vantaggi utilizzando questa funzione:
Criteri di sceltaPer impostare il ricevimento dell'ultima newsletter, puoi usare una delle seguenti impostazioni:
In Impostazioni Lista > Proprietà > Iscrizione attiva Invia l’ultima newsletter ai nuovi iscritti e imposta i criteri di scelta della tua ultima comunicazione. Usa il bottone Mostra messaggio per vedere quale messaggio è stato trovato dal sistema considerando i tuoi criteri di scelta.
Contenuto email
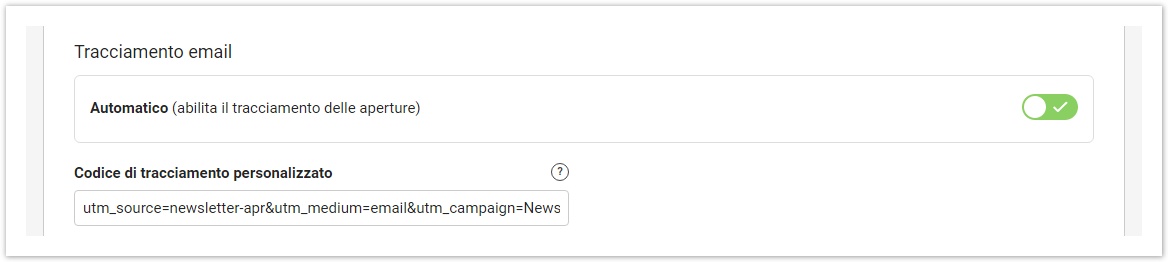
Tracciamento email
Autenticazione email
|
...
| Note |
|---|
The use of the Unsubscribe confirmation message is deprecated because it can lead to spam complaints and/or confuse recipients with regard to being truly unsubscribed |
SMS Option
...
SMS do not disturb time: the system can be configured in order not to send text messages at certain times of the day, when you think they might be disturb the recipients. Click on "Edit" to enable the feature and configuring the setup: you can choose whether to create the "do not disturb" area every day or on a certain time frame, the start and end times, and whether to restart sending at the end of it.
...
| title | Lavori in corso |
|---|
...
Opzioni SMS
1-a-moltiAbilita questa funzionalità per inviare email da qualsiasi client di posta elettronica, sfruttando la piattaforma. |