Overview
The Import function allows you to import a variety of formats:
- you can manually add an individual recipient to the selected List
- you can import a CSV, MS Excel, or XML file
- you can copy and paste text into MailUp, and have the system automatically detect an extract email addresses and mobile phone numbers
To get started, select Recipients > Import in the left-size navigation.

Important things to remember
- All recipients are imported as Subscribed unless you select a different option during the import process.
Existing recipients - matched based on their email or mobile phone number - will be updated (duplicates are never created); the subscription status will not be updated.
- Use the Advanced Import Options during the import process to change these default settings. The Subscription status and group assignment options section of the Advanced options overwrites the current subscription status (i.e. Subscribed, Pending, or Unsubscribed). It is therefore strongly recommended to read the Advanced Import section before using this feature.
Add individual recipient
You can add a new individual recipient to a List easily by first selecting the List > Recipient > Import and clicking on the Add Recipient icon. From there data can be entered in the fields. Inputting data to all the fields is not required but recommended to allow for highly targeted messaging. To add fields, go to Settings > Account Settings > Recipient fields

Import CSV/Text file
If you are importing the data from a CXV file, it is extremely important that the imported file be formatted correctly, in order to avoid issues with data corresponding to MailUp's dynamic fields (name, address, birthday format, etc.)
Here are some guidelines:
- The file should be in CSV format with a designated field separator*;
- The information in each field (e.g. name, last name, email address, etc.) should not contain any quotes or other characters that might be interpreted as separators by the system;
- Each field should not contain more than one e-mail address, or mobile number, or other data specific to that field;
- Phone numbers should be written as a series of figures, without any spaces or hyphens;
- When mapping the fields, map the mobile phone field to "Mobile";
- Each field should be filled, without leaving empty rows or columns (and we recommend not importing too many fields);
- Each row should have the same number of fields, and with the data in the same order (e.g. five fields for each row, containing email address, mobile number, name, last name and city, always in this order);
- It is better to have the e-mail address or the mobile number in the first field;
- On Step 2 (Next) of the import Wizard, assign groups (if any),
- On Step 2 (Next) of the import Wizard, choose the reading data options (field separator,) subscription status and replace new groups (if any.)
- On Step 3 (Next) Click on Import and in the case below, click Ignore first row.

Import an Excel file
Setting up the MS Excel file for importing
Before importing into MailUp, be sure to configure your Excel file to have:
- All the data in one worksheet (one single sheet). MailUp will automatically import the worksheet based on alphabetic order (not according to the sequence in the file. For example, if you have two worksheets in your file, the first named Volunteers and the second named Committee Members, MailUp will choose the worksheet named Committee Members.) To rename the worksheet, right click on it and select "Rename."
- The first row of your worksheet can have any value, such as the names of each column. How you order your columns in Excel is not important for the import. As we will see, during the import you can choose not to import the first row.
- Excel file not to exceed 10MB. If the Excel file that you are trying to import is bigger than 10 MB, the system may not be able to process it via the Web-based import procedure. In this case, consider reducing the file size by deleting any columns or data not strictly necessary for your email marketing campaigns. If you need to import a vast amount of data, you may choose instead an FTP-based import method.

Other suggestions to properly set up your MS Excel file before importing:
- Remove all worksheets except the one that you are importing
- Empty rows can create a problem. A quick way to remove them is to simply sort the records. To do so, select all rows by clicking on the top-left tile in the worksheet and by pressing the A-Z sorting button in the Data toolbar.
- It’s a good idea to remove all formatting before importing an Excel spreadsheet (e.g. in the screenshot above, there are some email links that should be removed). To do so, select all rows by clicking in the top-left tile and then select “Home > Clear > Clear Formats”
- If your worksheet contains a lot of columns, and there are columns that you do not need to import, remove them
Importing the Excel file in MailUp
In your MailUp platform, go to Recipients > Import and click on the "XLS" format icon. This method supports both past versions of Excel 97-2003 (i.e. .xls files) and current Excel versions 2007 and 2010 (i.e .xlsx files). Next, follow these steps:
- Click on the browse button to locate your Excel file and click on Upload. You should see that your file has been selected.
- Choose to assign the list of contacts from your Excel file into an existing Group in MailUp or create a new Group.
- Click on the "Next" button to continue.
- Now, you can map the columns of your Excel file to match the MailUp fields. You must match the fields in order for the data to be imported correctly. For example, the first column in my Excel file has email addresses, so I need to choose from the drop down tab Email.
- Continue mapping all your columns and once you are done click on Import, and in this case also select Ignore First Row.
- Be sure to follow the last step. Once you see your file in the Import queue, press Start Importing.
The system will import your Excel file and show you the status of the import.


You should then see this once the import has started:
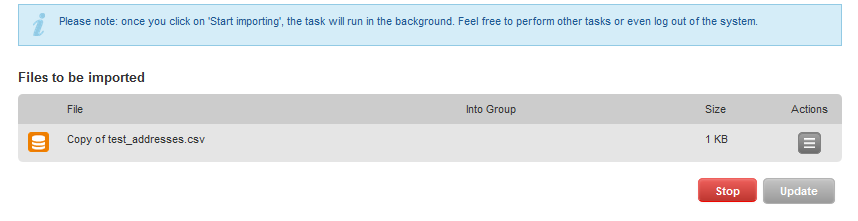
For large Excel files, the import process may take a few minutes. During this time, you can perform any other task and even log-out. The import process will continue until completed!
Copy/Paste Email and SMS
This feature allows you to extract emails and mobile numbers and import them. Just copy and paste the text from any document and the data will be automatically extracted.

Click Extract Emails button, and all emails in the text will be extracted and ready for import!

Size limitation
We recommend that this feature is used with 5,000 emails (or phone numbers) or less.
Advanced Import Options
The Advanced section on the Import page is a crucial step in the import process. It ensures your file is read properly upon import and allows you to choose the subscription preference.
After uploading your file on the import page you are taken to the second stage of the import process. Go to the Advanced drop-down and select from the various options:
Reading and data management options
The process of importing can also be used as a way to update your mailing list. In most cases, you re-import your mailing list with updated recipient fields (i.e. new collected information).
Sometimes, however, you want to keep certain recipient fields empty, and do not want the import to overwrite it. Only in this case, check the box.

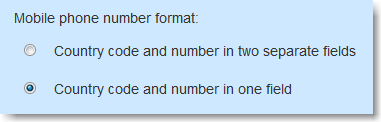
Phone number format
The default option is that country code and phone number are stored in one recipient field. However, you can also choose to separate the country code and phone number into two recipient fields for better segmentation.
Subscription status and group assignment options
Replace current group assignment(s)
Selecting this advanced option means that the imported recipients will be assigned to the group selected at the top of the screen and will be removed from previously assigned groups.

Import as Pending and send confirmation request email
The option to Import as Pending and send confirmation request email allows you to import recipients as Pending. Once you send out the confirmation request email (see section below), those recipients who chose to subscribe to your email communications will become Subscribed. This option overwrites any previously recorded subscription status (Subscribed or Unsubscribed).

Import as Pending Guide
Go to the step-by-step guide on How to Send a Subscription Confirmation Request.